Display

Display or export the details of a segmentation.
Signals
Inputs:
SegmentationSegmentation to be displayed or exported.
Outputs:
Bypassed segmentation(default)Exact copy of the input segmentation
Displayed segmentationSegmentation covering the entire string displayed in the widget’s interface
Description
This widget inputs a segmentation and displays on screen the content and the annotation of the segments that compose it. The widget allows the user notably to export the information in a text file. Moreover, it forwards the segmentation without any modification on its output connections. [1]
Display plays an essential role in schema construction: it is the best way to check that the configuration of the other segmentation processing widgets leads to the desired result in terms of segment and annotation creation or modification.
It should be noted that for long segmentations, the widget may appear stuck for a certain time after the progress bar has run – a problem related to the graphic interface library on which Orange Canvas relies. Unless memory overflow occurs, the problem normally solves itself after a few moments.
Basic interface
In its basic version, the widget formats the input segmentation in HTML and displays for each segment its number, its complete address (string index, start and end positions) as well as its annotations (see figure 1). The Navigation section enables the program to directly show a particular segment using Go to segment.

Figure 1: Display widget (basic interface).
It can be noted that the basic interface of Display is more sober than those of the other widgets of Orange Textable: it does not include an Info section, neither a Send button nor a Send automatically checkbox. What motivates this design is the will to emphasize the fundamental functionality of visualization of the input segmentation content and annotations – main reason for the use of Display in most cases. In this context, by default, data are automatically sent on output connections.
Advanced interface
The widget’s advanced interface (see figure 2) restores the Info section which indicates the number of segments in the input segmentation or the reasons why no segmentation is emitted (for example no input data). The Send button triggers the emission of a segmentation to the output connection(s). When it is selected, the Send automatically checkbox disables the button and the widget attempts to automatically emit a segmentation at every modification of its interface or when its input data are modified (by deletion or addition of a connection, or because modified data is received through an existing connection).
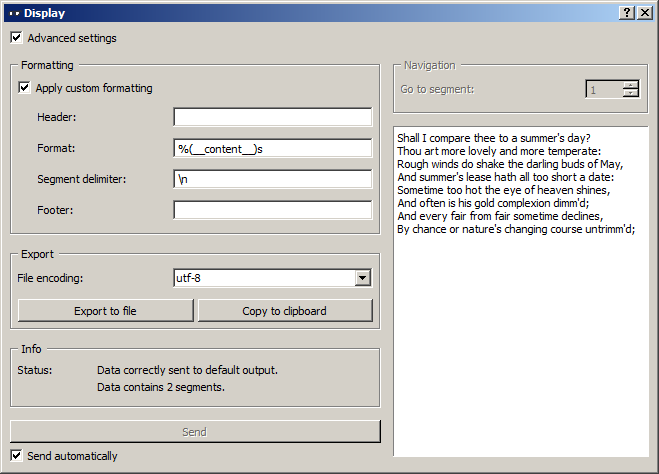
Figure 2: Display widget (advanced interface).
The Apply custom formatting button enables the program to produce a personalized rendering. In this mode, the formatting of each segment is determined by a string entered in the Format field. This string can contain text that will be reproduced as it is in the rendered output, as well as references to variables to insert in the output. These references take the following general form:
%(variable_name)format
where variable_name designates the variable to insert and format the desired format for this variable. For a basic use, all you need is to know that the format code s designates a character string and i an integer. [2] If the name of the variable is one of the following predefined strings, it will be interpreted as indicated in the right column: [3]
| variable name | meaning |
|---|---|
| __content__ | segment content |
| __num__ | segment number |
| __str_index__ | string index |
| __str_index_raw__ | string index counting from 0 |
| __start__ | initial position |
| __start_raw__ | initial position counting from 0 |
| __end__ | final position |
If on the contrary the name of the variable is not among those of the list, the program will interpret it as an annotation key and will attempt to display the corresponding value (or the string __none__ if this key is not defined for the considered segment).
The string entered in the Segment delimiter field, if any, will be inserted between each segment of the formatted segmentation. Use the sequence n for a line break and t for tabulation.
The Header and Footer fields enable the user to specify strings that will be inserted respectively at the beginning and the end of the formatted segmentation.
To take a simple example, consider the following (extract of a) segmentation of the string a simple example [4]:
| content | start | end | letter category |
|---|---|---|---|
| a | 1 | 1 | vowel |
| s | 3 | 3 | consonant |
| i | 4 | 4 | vowel |
| ... | ... | ... | ... |
| e | 16 | 16 | vowel |
By entering:
<word>\nin the header field,<letter pos="%(__num__)i" type="%(letter category)s">%(__content__)s</letter>in the format field,\nin the segment delimiter field, and\n</word>in the footer field,
we obtain the following formatting:
<word>
<letter pos="1" type="vowel">a</letter>
<letter pos="2" type="consonant">s</letter>
<letter pos="3" type="vowel">i</letter>
<letter pos="4" type="consonant">m</letter>
<letter pos="5" type="consonant">p</letter>
<letter pos="6" type="consonant">l</letter>
<letter pos="7" type="vowel">e</letter>
<letter pos="8" type="vowel">e</letter>
<letter pos="9" type="consonant">x</letter>
<letter pos="10" type="vowel">a</letter>
<letter pos="11" type="consonant">m</letter>
<letter pos="12" type="consonant">p</letter>
<letter pos="13" type="consonant">l</letter>
<letter pos="14" type="vowel">e</letter>
</word>
The Export section of the widget interface also allows the user to export the displayed segmentation (standard HTML or user-defined format) in a file. The encoding can be selected (Encoding) then click on Export to open a file selection dialog. By clicking the Copy to clipboard button, the user may also to copy the displayed segmentation in order to paste it in another application for instance; in this case, the utf-8 encoding is used by default.
When the option Apply custom formatting is not selected, the Navigation section is enabled and allows the user to view a particular segment through the Go to segment control.
Messages
Information
- Data correctly sent to output: <n> segments.
- This confirms that the widget has operated properly.
- Settings were (or Input has) changed, please click ‘Send’ when ready.
- Settings and/or input have changed but the Send automatically checkbox has not been selected, so the user is prompted to click the Send button (or equivalently check the box) in order for computation and data emission to proceed.
- No data sent to output yet: no input segmentation.
- The widget instance is not able to emit data to output because it receives none on its input channel(s).
- No data sent to ‘Displayed segmentation’ channel, see ‘Widget state’ below.
- A problem with the ‘Format’ parameter prevents this widget instance from operating properly, and additional diagnostic information can be found in the Widget state box at the bottom of the instance’s interface (see and Errors below).
Errors
- Format mismatch error: a <variable_type> is required.
- In the advanced interface, the string entered in the Format field
indicates that a variable of a certain type (e.g. float) is expected,
but in at least one case, the corresponding value is of another type
(e.g. string). The string type (e.g.
%(__content__)s) is usually the safest bet. - Format mismatch error: not enough arguments for format string.
- In the advanced interface, the string entered in the Format field
indicates that a variable is expected but in at least one case, there is
no corresponding value. Make sure that no placeholder is used without an
explicit name (always use e.g.
%(__content__)s, and never%s). - Format error: missing variable type.
- In the advanced interface, a variable type indication is missing in the
string entered in the Format field. Make sure that no placeholder is
used without a variable type indication (always use e.g.
%(__content__)s, and never%(__content__)). - Format error: missing name.
- In the advanced interface, a variable name is missing in the string entered
in the Format field. Make sure that no placeholder is used without a
variable name (always use e.g.
%(__content__)s, and never%()s).
Examples
Footnotes
| [1] | The widget also sends, on a second channel not selected by default, a segmentation with a single segment containing the entire string as it is displayed in the widget’s interface. |
| [2] | For more details on the syntax of format codes, see Python documentation. |
| [3] | In general, predefined strings in Orange Textable have in common that they begin and end by two underscore characters (_); it is greatly recommended to avoid this form for every name supplied by the user (in particular for the segmentation labels, as well as for the keys and annotation values). |
| [4] | By convention, we do not indicate here the string index associated with each segment but only its start and end positions, along with the annotation values associated with it; moreover, for the sake of readability, we do indicate the content of each segment, though it is not formally part of the segmentation (but rather of the string to which the segmentation refers). |