Text Files

Import data from raw text files.
Signals
Inputs:
MessageJSON Message controlling the list of imported text files
Outputs:
Text dataSegmentation covering the content of imported text files
Description
This widget is designed to import the contents of one or several text files in Orange Canvas. It outputs a segmentation containing a (potentially annotated) segment for each imported file. The imported textual content is normalized in several ways:
- it is systematically converted to Unicode (from the encoding defined by the user)
- it is subjected to the canonical Unicode decomposition-recomposition technique (Unicode sequences such as
LATIN SMALL LETTER C (U+0063)+COMBINING CEDILLA (U+0327)are systematically replaced by the combined equivalent, e.g.LATIN SMALL LETTER C WITH CEDILLA (U+00C7)) - it is stripped from the utf8 byte-order mark (if any)
- various forms of line endings (in particular
\r\nand\r) are converted to a single form (namely\n)
The interface of Text files is available in two versions, according to whether or not the Advanced Settings checkbox is selected.
Basic interface
In its basic version (see figure 1 below), the Text Files widget is limited to the import of a single file. The interface contains a Source section enabling the user to select the input file. The Browse button opens a file selection dialog; the selected file then appears in the File path text field (it can also be directly inputted with the keyboard). The Encoding drop-down menu enables the user to specify the encoding of the file.
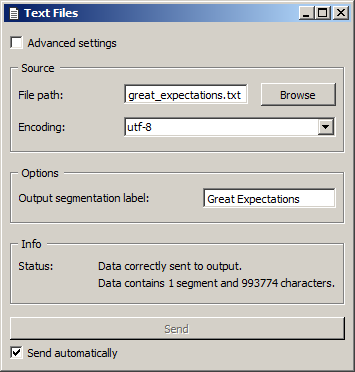
Figure 1: Text files widget (basic interface).
The Options section allows the user to define the label of the output segmentation (Output segmentation label), here Great Expectations.
The Info section indicates the the number of characters in the single segment contained in the output segmentation, or the reasons why no segmentation is emitted (no input data, encoding issue, etc.).
The Send button triggers the emission of a segmentation to the output connection(s). When it is selected, the Send automatically checkbox disables the button and the widget attempts to automatically emit a segmentation at every modification of its interface.
Advanced interface
The advanced version of Text Files allows the user to import several files in a determined order; each file can moreover be associated to a distinct encoding and specific annotations. The emitted segmentation contains a segment for each imported file.
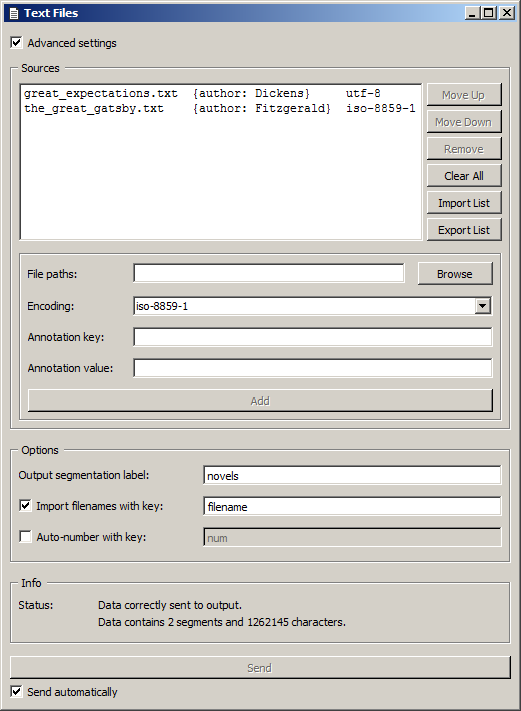
Figure 2: Text files widget (advanced interface).
The advanced interface (see figure 2 above) presents similarities with that of the URLs, Recode, and Segment widgets. The Sources section allows the user to select the input file(s) as well as their encoding, to determine the order in which they appear in the output segmentation, and optionally to assign an annotation. The list of imported files appears at the top of the window; the columns of this list indicate (a) the name of each file, (b) the corresponding annotation (if any), and (c) the encoding with which each is associated.
In figure 2, we can see that two files are imported and that each is provided with an annotation whose key is author. The first file associates value Dickens with this key and is encoded in utf-8; the second one has value Fitzgerald and is encoded in iso-8859-1.
The first buttons on the right of the imported files’ list enable the user to modify the order in which they appear in the output segmentation (Move Up and Move Down), to delete a file from the list (Remove) or to completely empty it (Clear All). Except for Clear All, all these buttons require the user to previously select an entry from the list. Import List enables the user to import a file list in JSON format (see JSON im-/export format, File list) and to add it to the previously selected sources. In the opposite Export List enables the user to export the source list in a JSON file.
The remainder of the Sources section allows the user to add new files to the list. The easiest way to do so is to first click on the Browse button, which opens a file selection dialog. After having selected one or more files in this dialog and validated the choice by clicking on Open, the files appear in the File paths field and can be added to the list by clicking on the Add button. It is also possible to type the complete paths of the files directly in the text field, separating the paths corresponding to the successive files with the string ” ” (space + slash + space).
Before adding one or more files to the list by clicking on Add, it is possible to select their encoding (Encoding), and to assign an annotation by specifying its key in the Annotation key field and the corresponding value in the Annotation value field. These three parameters (encoding, key, value) will be applied to each file appearing in the File paths field at the moment of their addition to the list with Add.
The Options section allows the user to specify the label affected to the output segmentation (Output segmentation label). The Import filenames with key checkbox enables the program to create for each imported file an annotation whose value is the file name (as displayed in the list) and whose key is specified by the user in the text field on the right of the checkbox. Similarly the button Auto-number with key enables the program to automatically number the imported files and to associate the number to the annotation key specified in the text field on the right.
In figure 2, it was thus decided to assign the label novels to the output segmentation, and to associate the name of each file to the annotation key filename. On the other hand, the auto-numbering option has not been enabled.
The Info section indicates the length of the output segmentation in characters, or the reasons why no segmentation is emitted (no selected file, encoding issue, etc.). In the example, the two segments corresponding to the imported files thus total up to 1‘262‘145 characters.
The Send button triggers the emission of a segmentation to the output connection(s). When it is selected, the Send automatically checkbox disables the button and the widget attempts to automatically emit a segmentation at every modification of its interface.
Remote control
Text Files is one the widgets that can be controlled by means of the Message widget. Indeed, it can receive in input a message consisting of a file list in JSON format (see JSON im-/export format, File list), in which case the list of files specified in this message replaces previously imported sources (if any). Note that removing the incoming connection from the Message instance will not, by itself, remove the list of files imported in this way from the Text Files instance’s interface; conversely, this list of files can be modified using buttons Move up/down, Remove, etc. even if the incoming connection from the Message instance has not been removed. Finally, note that if a Text Files instance has the basic version of its interface activated when an incoming connection is created from an instance of Message, it automatically switches to the advanced interface.
Messages
Information
- Data correctly sent to output: <n> segments (<m> characters).
- This confirms that the widget has operated properly.
- Settings were (or Input has) changed, please click ‘Send’ when ready.
- Settings and/or input have changed but the Send automatically checkbox has not been selected, so the user is prompted to click the Send button (or equivalently check the box) in order for computation and data emission to proceed.
- No data sent to output yet: no file selected.
- The widget instance is not able to emit data to output because no input file has been selected.
- No data sent to output yet, see ‘Widget state’ below.
- A problem with the instance’s parameters and/or input data prevents it from operating properly, and additional diagnostic information can be found in the Widget state box at the bottom of the instance’s interface (see Warnings and Errors below).
Warnings
- No label was provided.
- A label must be entered in the Output segmentation label field in order for computation and data emission to proceed.
- No annotation key was provided for auto-numbering.
- The Auto-number with key checkbox has been selected and an annotation key must be specified in the text field on the right in order for computation and data emission to proceed.
- JSON message on input connection doesn’t have the right keys and/or values.
- The widget instance has received a JSON message on its
Messageinput channel and the keys and/or values specified in this message do not match those that are expected for this particular widget type (see JSON im-/export format, File list). - JSON parsing error.
- The widget instance has received data on its
Messageinput channel and the data couldn’t be correctly parsed. Please use a JSON validator to check the data’s well-formedness.
Errors
- Couldn’t open file or Couldn’t open file ‘<filepath>’.
- A file couldn’t be opened and read, typically because the specified path is wrong.
- Encoding error or Encoding error: file ‘<filepath>’.
- A file couldn’t be read with the specified encoding (it must be in another encoding).